

BOO Kit - Instructions Prepared by Katie Watson
Directions for Home Décor “BOO” chipboard letters
Supplies needed:
Paper trimmer
Black ink
Black fine tipped pen (such as ZIG)
Scissors
Razor knife, swivel blade or straight (can also use scissors)
A wet glue such as Tombo, Fabri-tac (my personal choice) Mod Podge or whatever your favorite liquid glue is.
Pencil
Piece of fine-grained sandpaper
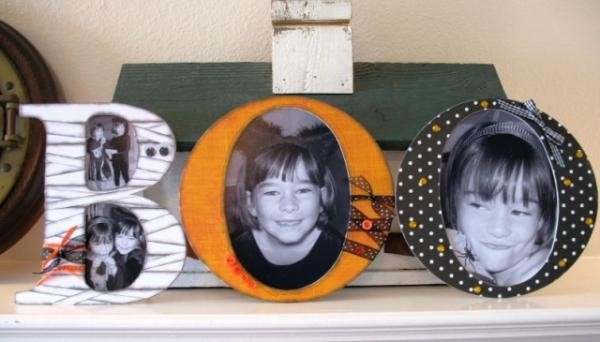
The Letter ~B~
Cut thin strips of the White Bazzill textured cardstock. Vary the widths from ¼ “ to ¾” , this is apx and they don’t have to be exact. Make sure that some strips are the same width as the “B” specifically the top, Middle and bottom of the “B”.
Using black ink, ink the edges of the strips (don’t worry about the ends, you’ll be cutting them off anyway)
-Layer strips across the B making them straight and flush against each other to make the background
--Using sharp scissors, razor knife or a coluzzle swivel blade, trim all edges so that the cardstock is the same shape as the letter. (see pic)
-Using thinner pieces of the strips of White Cardstock and arrange them in a criss cross pattern onto of background layer. Adhere them down and trim edges. Ink the outside of the letter around the edges.
Glue the Google eyes on the right side of the “B”. Wrap 3 pieces of ribbon around left hand side of the letter and tie in knots. Snip edges of ribbon at an angle.
The Letter ~O~
Trace the “O” onto the patterned paper. Cut out with scissors. Adhere to letter, lightly sand edges for a more finished look (this also helps to get rid of any paper that is over the edge of the letter).
-Ink edges with black ink.
-Using a fine tipped black pen, draw an oval border around the center of the O. Glue 4 buttons in a row and draw a decorative scroll (see pic)
Wrap polka dot ribbon around the edge of the letter criss crossing in the middle. Tie in a knot and snip ribbon edge at an angle. Glue buttons down ribbon.
The 2nd ~O~
Follow the same directions for above. Then randomly glue orange crystals around the “O” (it will look more spaced if you don’t glue them on the actual dots in the print of the paper)
Tie a bow and glue on the upper right hand side!
I custom sized printed my pictures to fit the openings in the letters. For the “O” letters I printed my pictures to a size 6” x 8” and for the small opening in the B, I printed them out to a size 2 ½ x 3 ½ and trimmed them to fit in the holes. Then I just glued the pictures to the back and trimmed whatever edges need to be trimmed.
No comments:
Post a Comment